my Pier and church models are massive files and rendering for the pier took 64 hours, and the church took 38 hours, if i had 1 extra week, i would re-render these as i made the corrections.
for the pier, i would have moved the sky, dueing the first render, during the gizmo i used a shere, this left a large line in the sky, these shows in the render, after the correction i rendered the few frames that showed the line, however the sea changed because it is reflective and as does the sky.
i would have also changed the camera, as it stands it spends a small amount of time on pritty much every part of the model, i would have changed this so it spent a small amount at the end, zoomed along the long it and did 1 orbit of the entrance, i would imagin this would have taken around 20-30 second.
for the church, i would have added the photo of the next scene to the photo frame inside the church, i forgot to add this and instead bobby had to add it in via after effects, this didn't look as good as it could have been.
another part, is the size of the scenary, i have made the scene bigger and was ready to render it again on Monday but was told not to, just incase we ran out of time, my "Church11" file has the corrections on this.
with Laboworth Cafe, i would have changed the sky, and used a bl;ue sky, rather then a sunset one, i believe tghis is the cause for the sea turning purple in places, the plane the sea is on is actually blue (255 blue, 0 red, 0 green) so it should not have changed to purple. Because the sky is a browny colour, whihc contains some red, i belive this is what changes the colour to purple. i would have had to change the sky for the Pier aswell.
Also, during the animation, when the camera goes through the doors, it looks around the inside of the cafe far to quickly, i tried slowing this down in Adobe Premier, i tried reducing the speed for this part down to 50%, but this also reduced the FPS to 15, making it very jumpy, because of this, the speed was returned to 100%
Thursday, 9 December 2010
Monday, 6 December 2010


 i almost forgot to add the ramp leading to the sea for people's boats, we didn't take a image of this when we was there, i was reminded by a group member to add it, and here it is, i used tgeh same material i used for the sea dividers, i added grooves into the surface of it but extruding every other polygon upwards slightly.

 i then added a large hill to the scene with a grass texture, and the rest of the scene is copied and rotated round, to form a large "C" shape. in the picture the grass has come off the rest of the scene abit towards the right of the picture, but this will be sorted.
the sea-wall will also be copied and bent round to follow the shore.


 i added some steps to teh base of the cafe, and added a back room to teh cafe where the kitchen is, i have also added a table and chairs, whiohc i then grouped and copied a few times, i couldn't find a picture of the inside so my friend, who has been inside drew a basic floor plan for me and i made it from this.
 i have now edited the back wall so that it is flat, and removed one of teh windows to add the front doors, these are seperate objects and i have changed the pivote point so that when i rotate them, it apear the open on hinges, i will have these open on the animation.
i have also added the railings on the roof.
for some reason, the file couldn't find the material of the walls and has changed to the default grey, but at this stage i have actually added materials of the outer walls, whihc i got from a photo we took.
 this is the model with windows, at this stage i thought the back of the building was indented, as you can see in the picture, however it isn't, when we went to see the cafe, the shutters were down so we couldn't see inside, and becasue the sea wall goes around the back we couldn't see what it looked like from behind, i found a image online whihc i beleived was the back view however it turned out to be the front view from many years ago before it was altered. later i will change this so that it is flat.
 i then added the windows by insetting certain polygons, by using the inset button it also gave a frame to the windows at the same time.
All the windows will have a blue glass material added to them and will be made see-through.
i added the name of the cafe above the windows, same as they are on the photo's we took when we visitied it.

Labworth Cafe
my third and final model is Labworth cafe, which is located along the seafront on Canvey Island, it is a art deco style cafe.
for some reason this scene took 38 hours to render, and i am not happy with the results, there are many aspects i'd like to change, for example in part of the animation the roads just suddenly ends, same with the shops.
however to correct these issues i'd need to re-render it all again, and i don't have the time to do so. i have made the corrections and are saved but i will not be rendering it.
however to correct these issues i'd need to re-render it all again, and i don't have the time to do so. i have made the corrections and are saved but i will not be rendering it.

 i have now started using a camera, and in doing so, this shows me were i need to edit so that the edge of the scene isn't visible, i can change this by adding shops to the scene, i found these by search for shop front images on googles, i then added these to several planes and made them follow the road round.


 i have now added the church windows to the spaces i had added earlier, i did this by using photo shop and cutting out the window from one of the photos we took, i then added these to a seperate plane and then positioned these into the window gaps, i then copied this and placed it into all the windows, for the smaller windows i scalled the image so that one of the smaller window peices is all that shows.
 on the grounds of the church there where hundreds of graves of all different shapes and sizes, so i created a few different templates of graves, on this picture you can see only two different ones, i added a stone texture to these.
also in the background of this screen shot, you'll see i have also added a dark wood texture to the wooden archway, this materials was created from a photo taken on ouir visit to the church.
 i found a very good tree model pre-set into 3DS max, this saved alot of time, however... becasue it is very detailed, i believe this is the reason it took so long to render in the final animation, i used this and an oak tree aswell, and then positioned them around the scene, using the google earth image to place them correctly.
 The church had a really nice gate to teh grounds, it was attached to the wall, the bottom part is made from brick, the roof is made from roof tiles and the rest is wooden supports.
i made this the same way as the arch way, i created half and then mirrored it over. i then deleted some of the polygons from the wall to fit this in place


 the main feature of this church is its wooden archway, it is one of the oldest of its kind in the country, i created half of this object and then mirrored it over, i put alot of detail into this part, but i think in the end it was unnecessarily complex, as it doen't show that well in the final render.


 i then added a brick material to the walls and a roof tile materials to the roof.
once i had done this, i created a window from a seperate object, i then added the same material as the rest of the walls, i put it in the correct place and pressed alt+x to make it see through. i then deleted the polygons from the church and attached the window object to the rest of the church.
to start with, i found the church on google maps, and took a screen shot of it, i then used this to produce a floor plan of it. we visitied this place aswell and took photo, using these i got a good idea of the height of certain areas.
to begin with i added a box, from this i extruded in all four directions, to form a cross shape, and the top part, i then extruded upwards.
i then used a cylinder with only 3 sides to form the roof, i then attached these to parts together, and this is the start of my church.
to begin with i added a box, from this i extruded in all four directions, to form a cross shape, and the top part, i then extruded upwards.
i then used a cylinder with only 3 sides to form the roof, i then attached these to parts together, and this is the start of my church.

Benfleet St Mary's Church
My second model is Benfleet St Mary's Church, the reason for choosing this place is becasue it is one of the oldest churchs in essex, and the country, and also known for having the oldest wooden archways aswell.
 as a group, we decided that to go from scene to scene, we would use the first frame of the next scene and use this as an image in a photo frame, the camera will zoom into this and then the next scene will continue from there, this photo frame will be positioned behind the desk at the entrance of the pier.
 i decided to add the train to give a better animation, this will move slowly along the rails, this was created the same way as the rest of the buildings to give an interior, at first i created the front of the train, i then copied this and altered it slight. getting rid of the sloped front and making it flat, i then copied this a few times to give several more compartments, and then copied and rotated the front again to give the other end of the train. i then group all the sections of the train to make it one part, so when i made it move, it moved all together.
 i tried adding a wave modifier to the sea, but becasue of the size of the it, i found it hard to sea any changes when altering the setting, i countered this by remaking a small section of water, and importing a small section of the pier walkway, this gave me a good idea on the setting for the waves, once i was happy with this wave, i then copied the setting for my sea on the pier
 the next step was to improve the surroundings of the pier, i created a long hill, covered in grass, this bends round so that it doesn't just simply come to a end, the pavement at the entrance of the pier is copied and follows the hill, as does the road and sand.
The water was created with a water texture found on the 3ds max library, i then added several bump maps, increasing in size and a noise map ontop of this. i then made it reflective.
for the sky i added a large Geosphere, and applied a sky material found on google, then in the modifier panel i selected "Normal" this flipped all the polygons so the sky material was on the inside, rather then the outside.
a Omni light was then added to act as the sun. Rather then having it as a default of white, i gave it a grey/cream colour and increased the intesity slightly.
the combination of all these gave this result.
 at the far end of the pier, we found a life boat station, this was hard to modal as we couldn't get close enough to take any actuate pictures and on google maps its all blury, however this is what i could make out of the few picture i did find.
the grey parts do have a materials applied to them, it is a grey metal material, it just doesn't show very well and apears to have no material at all.
 the next section of the pier is another sqaure area, but this time it has a small cafe, toilets and another shed type structure, me and the rest of the group had lunch here on our visit so i had a good idea of the layout inside. the same technique was used with this building as with the train information room and the entrance.
 this is the information building for the train station, it has a unusual design, i used the same technique as with the entrance building. i copied the room, scaled it a very small amount, changed the colour to cream, flipped the polygons around and put it back inside the original building, this gave the room an interier, this was then placed on the end of the raised flooring next to the blue sheltered seating area.


 this is one of the small shelters that are positioned along the pier, a total of 4, and one has vending machines.
i copied a section of the pier, along with the supports and pulled it out, i then joined the polygons together and imported the shelter in.
the roof has the same material as the shed roof's and the walls have a blue metal texture, the chairs are made from the same material and so i have given them the same material as the walls.
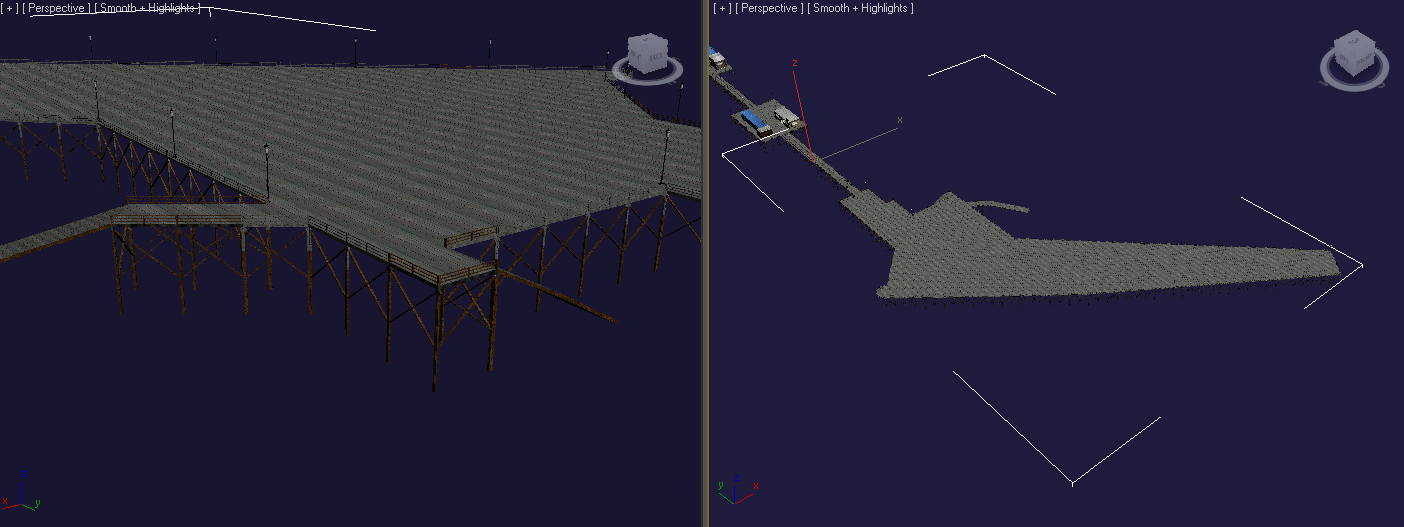
 this is the view of the pier so far, lamp posts have been added. Because of the massive size of the model, i had the problems of the program crashing when rotating, to sove this problem i had to create the rest on another file and import it in, this also solved the issue i ahd with materials i had also ran out of spots for this also.
 i now had to carry on with the rest of the walway along the pier, i did this by creating a new object and using the correct sizes as the rest of the pier, i created a small section of the pier, i had the intension to copy this many times to get the full lenght, after a small search of the web, i found the correct lenght of the pier, and using my own personal expierence, i come to the conclusion that this section i ahd created was around 10m in lenght, using this i calculated how many times i had to copy it, the results being 180 times, i had to guess how long the entrance to the pier was, along with the end part.
a few alteration would need to be added, as there are random structures along the pier like small shelters, and a overlap for the train rails.
 i found a good sand texture on google, and slighty altered it so that the edges matched, i did this by using photoshop, using the stamp tool, i lowers the opacity to 50% and did the top and bottom, and then side to side, this minimized the square box effect when applying as a material.
for the time being i added a large blue plane to act as the sea to give me a good idea of the height of the pier from the surface of the sea.
 on the large square section of the pier we found two random shed type structures, these, along with the lamp posts are the only objects on this section.
first i created one by using a box, i made sure that there was only two polygons on the top of the box, i then pulled the centre line upwards to give the shape of the roof, i then extruded the two top polygons upwards slights, and then on the sides of these to make them stick out slightly.
The foof material was taken by our camera on our visit to the pier and was used for most of the structure on the pier.
The two buildiongs had different wood materials, as this is how they actually are.

 the pier has hundreds of lamp posts running the full lenght of it, thislamp post was created with cylinders and a box for the base, if i had my way, i would have added a omni light to it, and made the whole pier set at night, i think this would have made it look far more impressive.
this being said, i wouldn't have had denouygh time to render it, the final render of the pier animation topok over 64 hours, if i added lights, this would have taken far far to long and i would have probably run out of time.
Subscribe to:
Comments (Atom)